Moving Tips & Resources
Home Staging Photography 101: 5 Tips to Make Your Home Stand Out
Whether you’re considering real estate photography for your home, or you’re a real estate agent managing a photo (and/or video shoot) for your client’s home, you know that 8 out of ten buyers view a home online before agreeing to see it in-person.
With people becoming more comfortable seriously considering and even buying homes based on what they see online, these shoots can be incredibly important when it comes to getting potential buyers through the door, and even opening up your home to a large pool of out-of-state buyers.
While that information can be daunting enough to push you to invest more in photography and videography of your home, as with most things, less is actually more.
The right photos – with beautiful light to highlight your homes assets – will draw in potential buyers for showings, and then with the right staging, those showings will turn into offers.
- Good lighting makes a listing
Good lighting is so vitally important that it has to be the first thing you focus on. Prior to the home shoot, make sure to clean all windows, and open curtains or blinds as much as possible. Every bit of light you can let into the space will help make the home feel clean, filled with light and open.
If your home is dark in places, make sure the photographer or videographer has an external source of light they can bring in to ensure no area of your home comes off as cold or dark. This includes areas like attic or basements, where people don’t necessarily expect light, but they want to get a sense of the space.
- Declutter your space to open it up
Great listing photos start by properly prepping your property. Even high-quality photos can be ruined by a cluttered space. It is so important to make sure you are decluttering your space, and removing any personal items like family photos, prior to the shoot.
This means removing most, if not all, personal effects – think small items such as family photos, knick-knacks, even down to fridge magnets, all the way up to larger items such as unnecessary furniture, or large, bulky furniture that make rooms appear smaller.
This even applies in not often seen areas you may not think matter, such as attics, garages and sheds. Pack away, remove and store as much as you can in these areas so people can see the space properly, and visualize how they could use the space. People do their great listing photos a disservice by thinking the garage “doesn’t matter” to buyers. Nationwide, homes with garages sell for $23,211 more than homes without garages, which equates to a 12 percent premium. While these spaces don’t need to look brand new or unused, they are important to buyers and should be tidy and as clear as possible. You want people to think that if they buy your home, all of their storage issues will be solved!
A few tips for staging the home properly for listing photos and videos are:
Prior to photoshoot day
- When in doubt, keep the space as clear and decluttered as possible.
- Don’t go overboard with a staging style unless you’re confident in your styling decisions.
- Enlist a moving company early – the better moving companies will offer storage as well and can easily pick up decluttered items to store as a first phase of your move, and then deliver them along with the rest of your belongings on moving day.
- Invest in a cleaning service, or set aside a day to do it yourself, for a deep clean. This means everything is dusted and polished to shine down to the baseboards.
- Ensure all windows and mirrors are clean to let in a maximum amount of light.
- Consider paring down your wardrobes to ensure that closets don’t appear stuffed and unorganized. Start by removing any seasonal clothes and shoes.
- Bring in fresh flowers and plants to place around your home strategically. This gives the space a homey feel without being too personal.
Shoot day to-do’s
- Put away any pet toys, food bowls, leashes, dog beds – anything that would let people know that animals live in the home.
- Park cars away from the home so the driveway and garage are empty – plus, you do not want your license plates ending up in photos.
- Hide trash or recycling bins away from the house.
- Ensure all TVs and computer screens are turned off, as well as any overhead fans.
- Put all toilet seats down, pull back shower curtains halfway so fixtures are visible, and remove any personal items such as toothbrushes or hair combs.
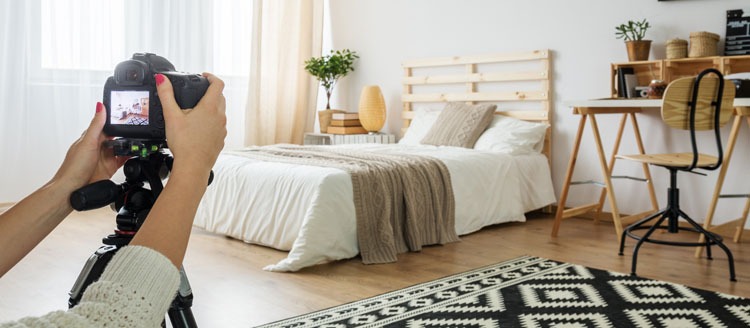
- Work camera angles to optimize the room size
Using angles to work in your favor is the best way to work smarter not harder to ensure sure your photography and videography allows your space to shine. This can help make the space inside of a room feel more open.
Setting up an angle in a threshold or entryway into a room can help maximize the space and showcases the entire room instead of just one area. Focus on showcasing the size of the room, and visually showing off the floorplan.
A video of your home will be especially helpful in showing off the layout to potential buyers. It will also give buyers a sense of the flow of the home, and this is great for out-of-state-buyers. By providing a listing video, you will be broadening the pool of people who will consider your home based on listing alone.
In larger rooms, take photos or videos from eye level or above. For smaller rooms, like bathrooms, take photos from eye level or below. Take at least two pictures using different of each room so you can decide which shows off the room’s assets better. This is especially true for key areas, like the primary bedroom and bathroom.
- Use Photoshop as a tool, not your whole strategy
Photoshop is a wonderful thing, but it can be overdone. Make sure you’re using it sparingly and when necessary – for example, small things like lighting, tone or showcasing the view outside of the window or, or putting a fire in a fireplace that wasn’t lit at the time of the photo and video shoot.
You want to make sure that Photoshop accentuates your home’s positives and minimizes the negatives, showing your home in the best possible light. But you don’t want to use it as a way to visually lie to buyers.
Real estate photography is meant to pique a buyer’s interest with a realistic but optimized online listing in order to get them to tour your home in-person. The last thing you want is for them to feel disappointed in your home when it falls far below live up to what they saw online.
You want to set a realistic expectation for what they will see when it comes time to view the home. While it’s ok to for example, put a fake fire burning in the fireplace (as long as it’s a working fireplace) to show how cozy the room can feel, you’ll want to stop before photoshopping in or out blemishes, imperfections and home features that will be clearly visible during a walkthrough.
Plus, the more photoshopping is done, the more a photographer will charge. That is why it is so important to declutter a space prior to photography – that way there is no need to unnecessarily digitally remove boxes, excess furniture or other items, it will likely cost you more anyway.
- Hire a professional at each stage
DIY is a wonderful thing that can save you a lot of money on your home, but with eight out of 10 buyers viewing your home online to determine interest, this is not one of them. While you can take your home listing photos or videos yourself, it’s best to hire a professional! Your real estate agent will likely have a list of qualified, proven photographers and videographers for you to choose from.
Since you might also want assistance simplifying your home, and Daryl Flood has a declutter and store service that will make the process simple for you. When you need certain furniture or boxes removed for listing photos or showings, we can easily pick them up, safely store them in our local Texas warehouse, and then deliver them with the rest of your items on move in day.
Contact us to learn more about our moving services, as well as our declutter and store programs.